Manage contacts
In this article you'll learn how to import, edit and delete your contacts in our contacts module (CRM).
Note: Managing contacts belongs to the paid extension, Contacts.
Table of contents
A simple CRM for managing your contacts in eyevip, the contacts module includes the option of segmentation and contact history. For each event, you decide whether or not you create your digital guest list via the Excel import, via our contact manager or a combination of both.
Import contacts
Excel template
Contacts can be imported using an Excel template. Start by downloading the template and continue by populating it. The downloaded Excel file contains the correct column names and sample values.
You can find the template in your eyevip under Contacts > Contacts > Upload Contact List.
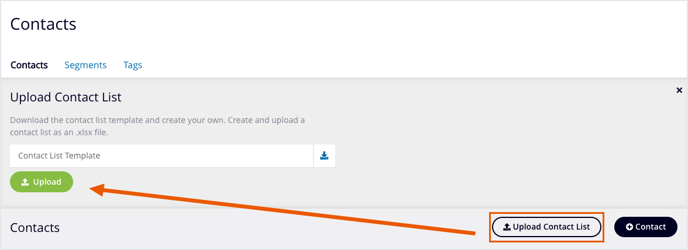
Attention: Don't change the column names and pay attention to the allowed values. Be sure to remove cell formatting, including colors and borders, as well as all formulas.
Allowed values
When creating your contact list in Excel, use the values found below:
| column | required | allowed values | ||||||||||||||||
| Title | no |
|
||||||||||||||||
| Firstname | no | all | ||||||||||||||||
| Lastname | no | all | ||||||||||||||||
| Street, Street No., Zip, City, Country | no | all | ||||||||||||||||
| yes | valid email address | |||||||||||||||||
| Language | yes |
|
||||||||||||||||
| Tags | no | multiple tags are separated by commas | ||||||||||||||||
| Team, Departement, Company, Jobtitel, Title addition, Annotation | no | all | ||||||||||||||||
| Sender, 2nd Signature | no | All existing senders |
Upload Excel list
Select Upload to import the Excel list into your contacts.
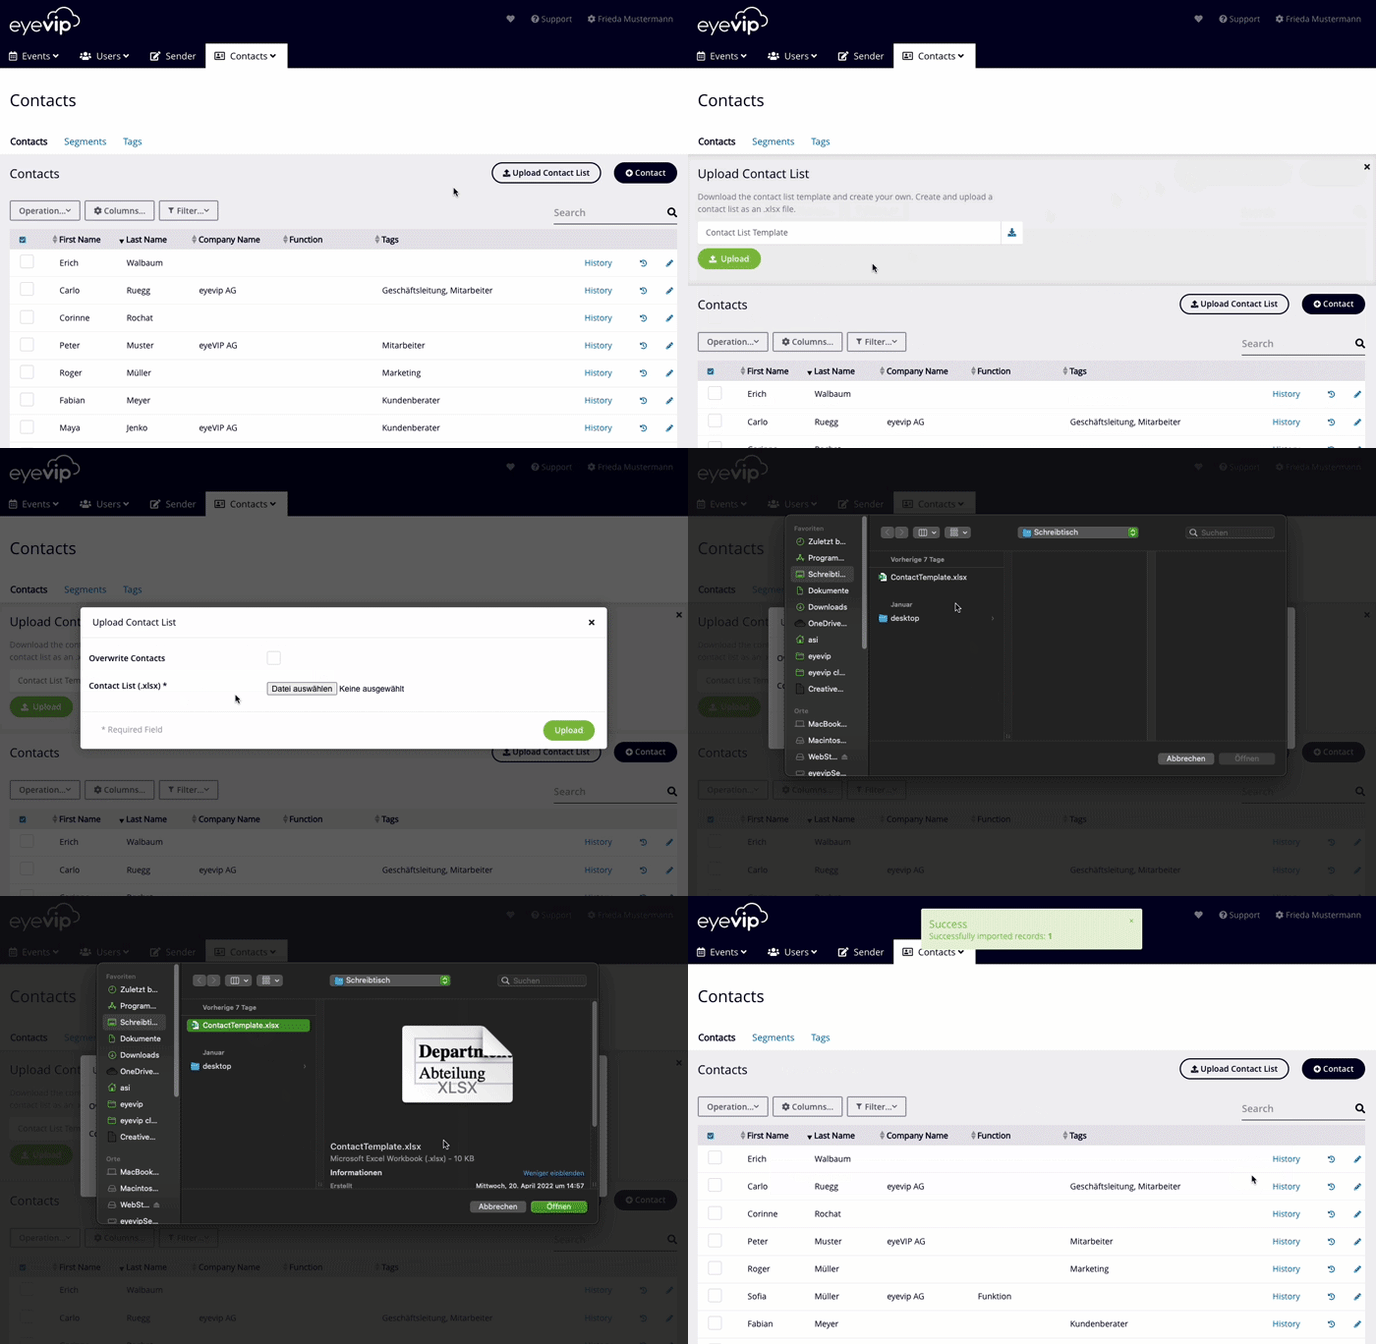
Attention: If you select Overwrite contacts, existing contacts with the same email address will be adjusted or overwritten.
Edit contacts
Edit individual contacts
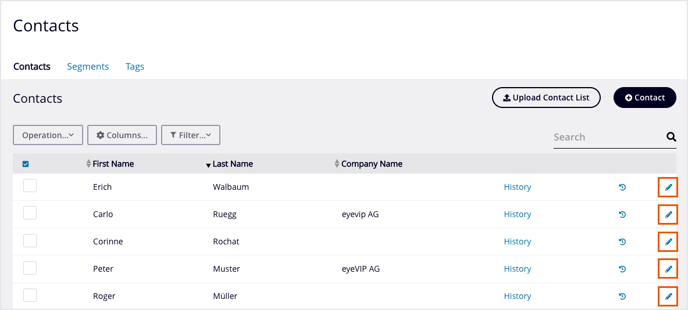
To edit a contact, click on the blue pencil icon found on the far right of the entry you want to edit and adjust the desired fields.
Bulk edit
If you want to make the same changes to several guests, you can bulk edit. An example of this could be the use of a new sender, due to personnel change or the company name was replaced.
Bulk editing takes place in three steps.
1. Search contacts
The system needs to know which contacts you want to edit. Searches can be created with one or more conditions.
- In Contacts, click Action and Bulk Data Editing.
The bulk data editing window opens. - In the first field, select an attribute with which the contacts should be filtered. In the second field select whether the value of this attribute should match a certain value or not (is equal to, is not equal to or is empty). In the last field you enter the value for filtering (or select it from a list, depending on the attribute).
Example
You want to edit the sender of all contacts of a certain company because it is managed by a new person. The search query would be the following: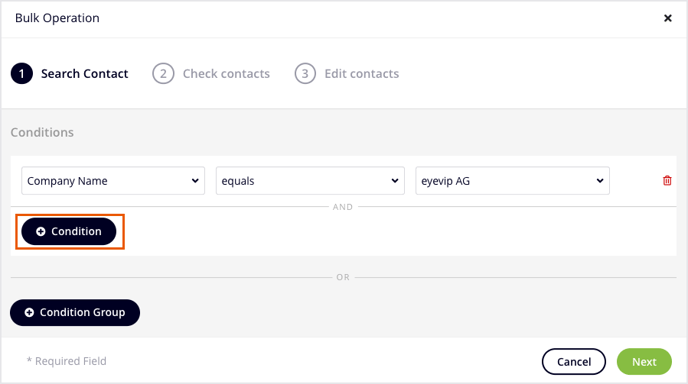
- You have the option to narrow the search query with additional conditions. Click + condition to create a condition.
Example
You want to edit the sender of contacts from a specific company at a specific location. The search query would be the following: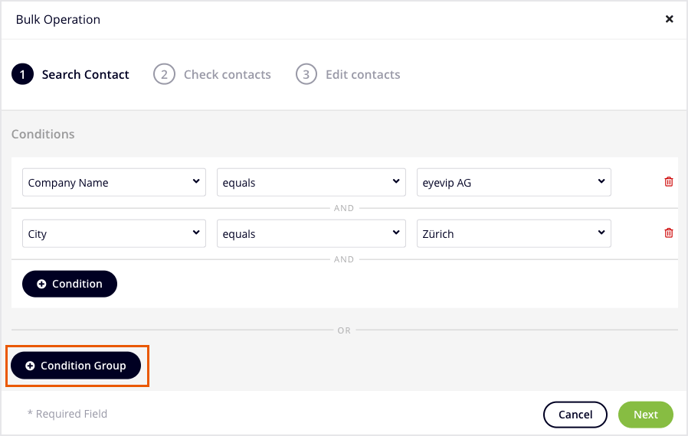
- If you prefer to open your search query, click + Condition Group.
Example
You want to edit the sender of two companies. The search query would be the following: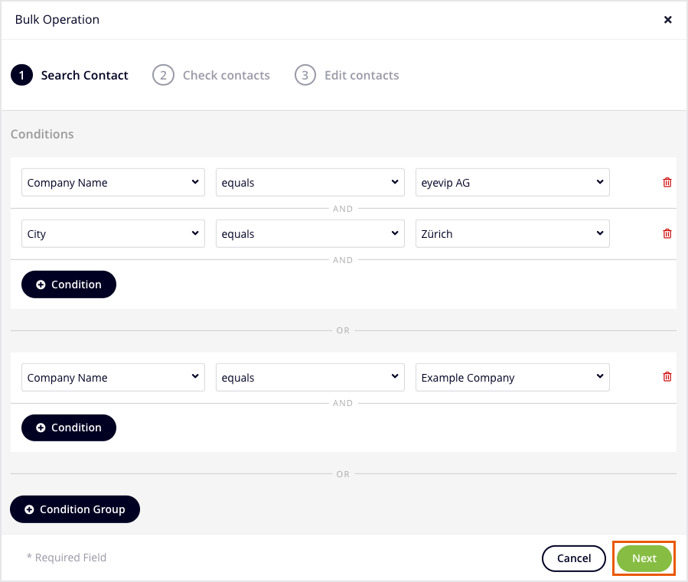
- Then click on Next.
2. Review contacts
- Check the contacts from your search query. The data of these contacts will be processed in the next step.
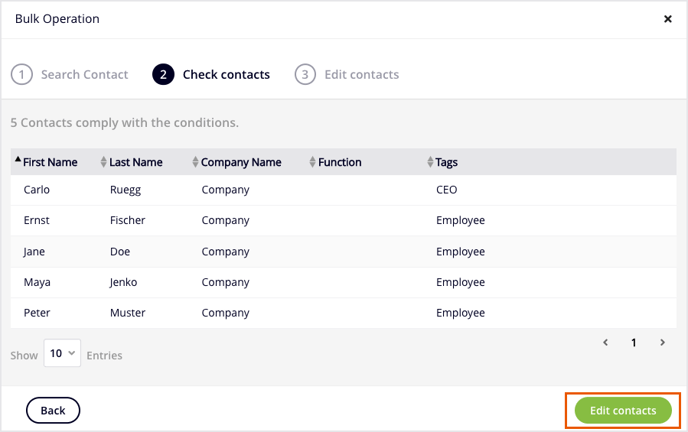
- Click Edit Contacts to change the attribute in the next window.
- In the first field, select the attribute you want to change. In the second field you can choose whether you want to set a new value for the attribute or remove the existing value (set value or remove value). If you have chosen "set value", you can enter the desired value in the last field (or choose from a list, depending on the attribute).
Example
You want to edit the sender of the contacts: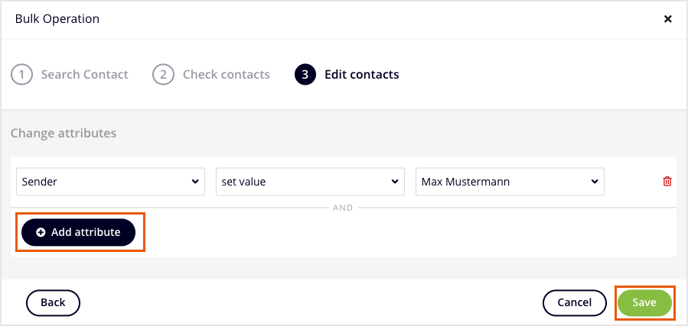
- Click + Add Attribute to edit additional attributes.
- Then click on Save to execute the mass data processing.
Delete contacts
Delete individual guests
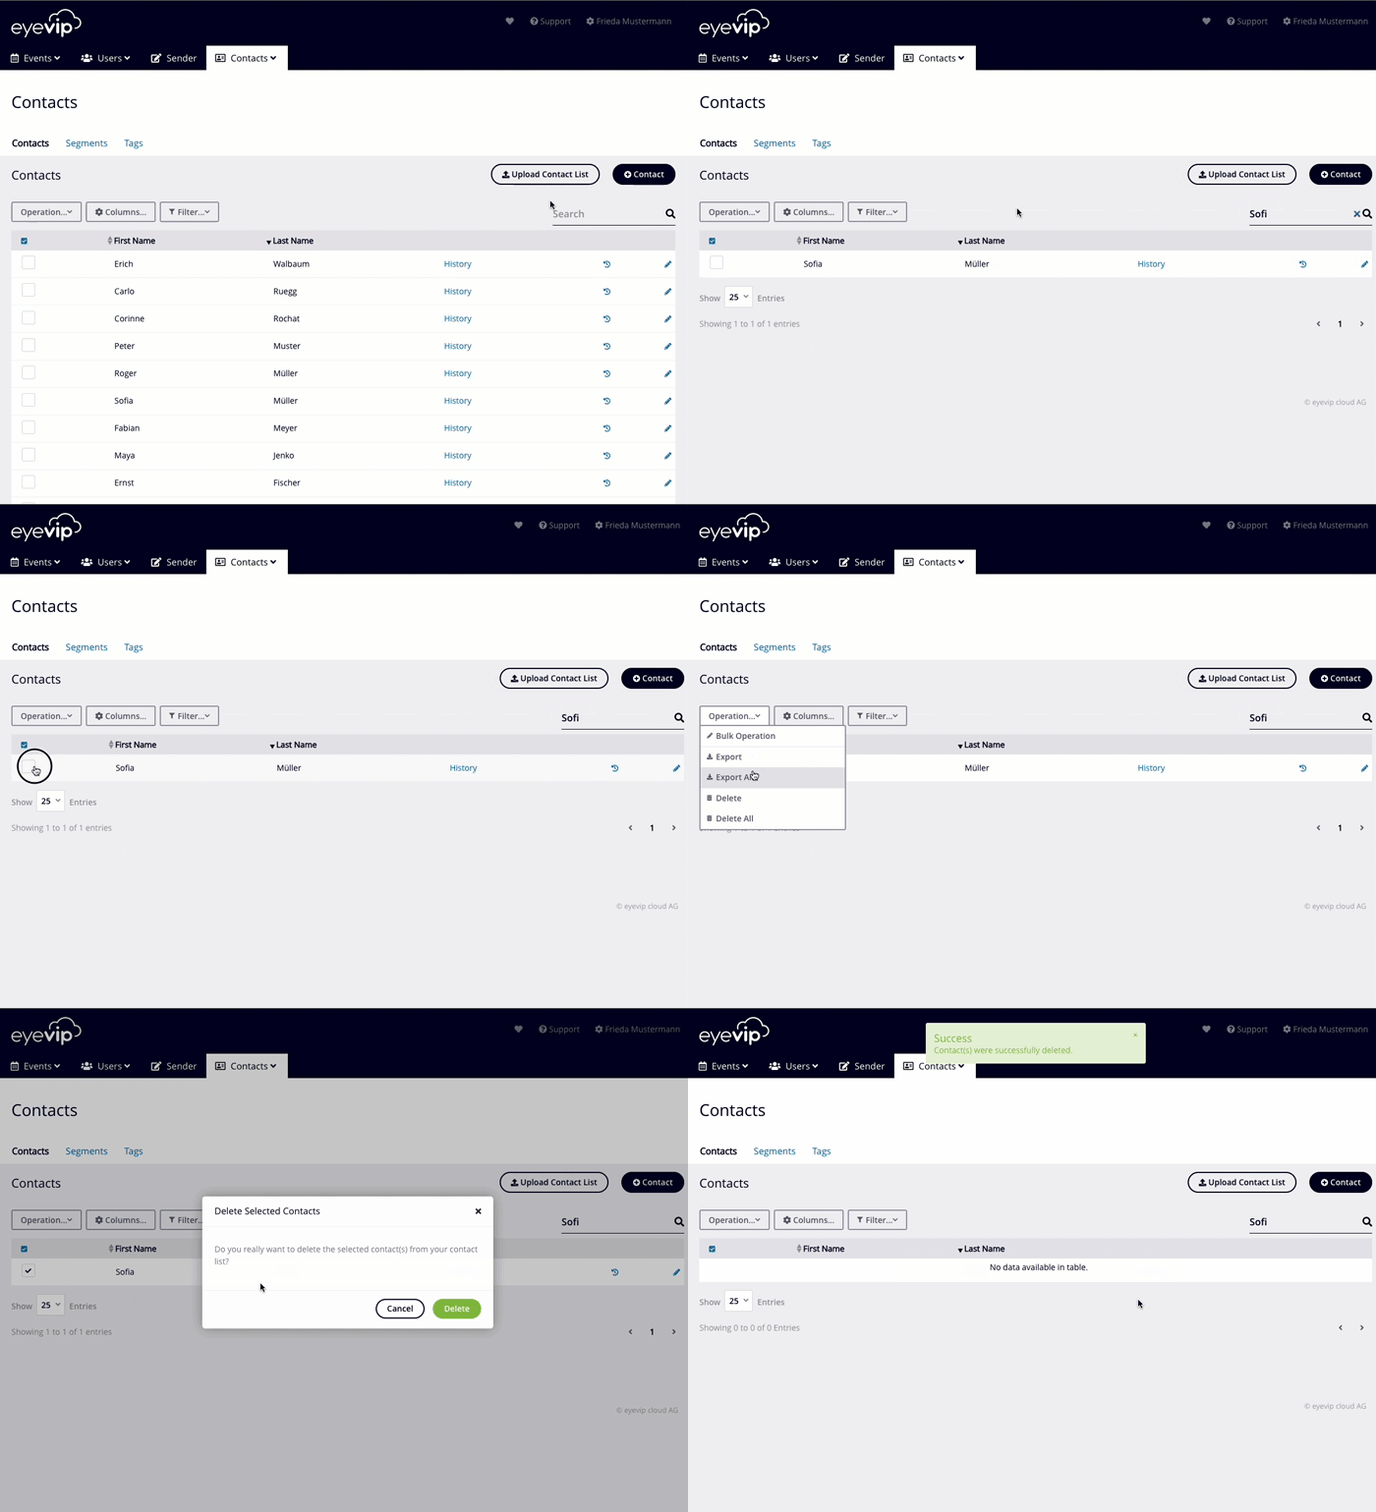
This way you can delete an existing contact:
- Search for the contact using the search field.
- Select the contact using the checkbox on the left side of the entry.
- Then click on Action and Delete.
- A window will open prompting you if you really want to delete this contact. Confirm with Delete and the contact will be removed.
Delete multiple guests
This way you can delete a selection of several guests:- Select all the contacts you want to delete using the checkbox on the left-hand side of the guest list.
- Then click Action and Delete.
- Confirm if you really want to delete these contacts by clicking Delete.
Frequently asked questions (FAQ)
My contact list isn't uploading and I'm not receiving an error message. What can I do?
The problem usually lies with the Excel file. Review your Excel list with this checklist:
- Have the column labels been changed or are they missing altogether?
If yes, please copy the column name provided in the contact list template. - Were additional columns inserted, which eyevip does not recognize?
If yes, please remove the unrecognized columns and use only the columns included in the
contact list template. - Were cells formatted with colors or borders?
If so, please remove all formatting. - Does the file contain formulas?
If yes, please remove all formulas.
Attention: Please don't send us contact lists by email! Use a secure channel, such as SwissTransfer.
How many contacts can I upload at once?
Generally, there isn't a limit. If your contact list is very large, then the loading process is done in the background and can take several minutes. You'll receive an email as soon as the list is available in eyevip.